Imagine turning your forex trades from hit-or-miss guesses into precise, high-win setups that stack the odds in your favor.
If you’re tired of chasing trends that fizzle out or getting caught in false breakouts, mastering supply and demand in forex trading could be your game-changer.
This strategy isn’t just about spotting levels; it’s about understanding the market’s pulse and trading like the smart money pros.
Ready to dive in and boost your win rate while maximizing risk-to-reward?
Let’s get started.
Understanding the Four Types of Supply and Demand Zones
Before diving into flip zones, it’s crucial to grasp the four core types of supply and demand zones.
These patterns, rooted in market psychology, dictate where price is likely to reverse or continue.
Knowing them sets the foundation for mastering supply and demand in forex trading.
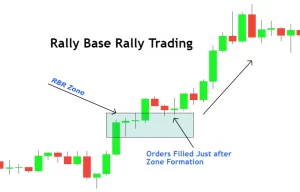
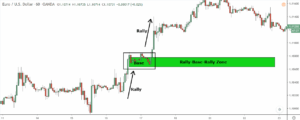
Rally-Base-Rally (RBR) – Demand Zone
-
What It Is: Price rallies, consolidates (base), then rallies again, forming a demand zone where buyers stepped in aggressively.
-
Why It Matters: These zones show strong buying interest, often revisited for buy entries.
-
How to Spot: Look for a sharp upward move after a consolidation, marking the base as the demand zone.
-
Trader Insight: “RBR zones are gold for buys—smart money loves these for accumulation,” says a veteran trader.
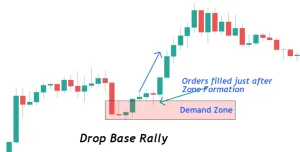
Drop-Base-Rally (DBR) – Demand Zone
-
What It Is: Price drops, consolidates, then rallies, creating a demand zone where buyers overwhelm sellers.
-
Why It Matters: Signals a potential reversal from bearish to bullish momentum.
-
How to Spot: Identify a price drop followed by a tight consolidation, then a strong upward push.
-
Example: On EUR/USD, price drops to 1.0900, bases, then surges to 1.1000—mark the base as a demand zone.
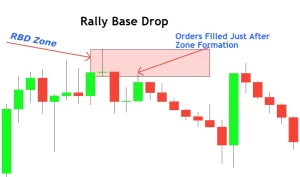
Rally-Base-Drop (RBD) – Supply Zone
-
What It Is: Price rallies, consolidates, then drops sharply, forming a supply zone where sellers took control.
-
Why It Matters: These zones are key for selling entries, showing heavy selling pressure.
-
How to Spot: Look for an upward move, a consolidation, then a sharp drop. The base is your supply zone.
-
Actionable Tip: Refine the zone to the candle just before the drop for tighter entries.
Drop-Base-Drop (DBD) – Supply Zone
-
What It Is: Price drops, consolidates, then drops again, creating a supply zone where sellers dominate.
-
Why It Matters: Indicates strong bearish continuation, perfect for sell setups.
-
How to Spot: Find a downmove, a consolidation, then another drop. The base marks the supply zone.
-
Real-World Example: USD/JPY falls to 150.50, consolidates, then plummets to 149.00. Mark the consolidation as a supply zone.
Mastering these four types, RBR, DBR, RBD, and DBD, gives you a clear map of where institutional traders are likely to act, setting the stage for spotting high-probability flip zones.
What Are Supply and Demand Flip Zones?
Supply and demand flip zones are the secret sauce for spotting market reversals in forex trading.
These are key points where a supply zone flips into a demand zone (or vice versa), signaling a shift in order flow.
Think of them as battlegrounds where buyers and sellers duke it out, and the winner dictates the next big move.
Why care? Because nailing these zones can skyrocket your profits.
As one seasoned trader puts it, “If you master flip zones, you’ll leave traditional support and resistance traders in the dust, higher wins, better rewards, and way more cash in your pocket.”
Supply to Demand Flip Zones
This type happens when a bearish downtrend starts showing cracks.
Picture price dropping, creating lower highs and lows, then hitting a supply zone that’s supposed to push it even lower.
But instead? It fails.
-
Key Signs: Look for a “failed reaction”, price taps the supply zone but creates a higher low instead of plunging deeper.
-
What It Means: Demand overpowers supply, shifting sentiment from bearish to bullish.
-
Actionable Tip: After the flip, wait for the price to retest the new demand zone. Enter a buy when it bounces, with your stop below the zone and target at the next resistance.
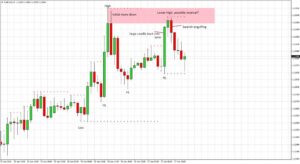
Real-World Example: In a EUR/USD downtrend, price hits an RBD supply zone at 1.0850 but forms a higher low at 1.0800. Once it breaks the previous lower high, confirming the shift, retest the flip zone for a buy—boom, ride the uptrend.
Demand to Supply Flip Zones
The opposite scenario: An uptrend loses steam as a DBR or RBR demand zone flips to supply.
Price pulls back to a demand zone that’s meant to launch it higher, but it flops.
-
Key Signs: Failed reaction here means price reacts upward but creates a lower high, failing to break new highs.
-
What It Means: Supply takes control, turning bullish momentum bearish.
-
Actionable Tip: Confirm with a break below the last higher low (structure shift). Then, sell on a retest of the new supply zone, stop above, and aim for the next support.
Trader Insight: “These flips are like market psychology in action. Buyers get exhausted, sellers flood in. Spot the failure early, and you’re positioned before the crowd.”
How to Identify and Trade Flip Zones
Identifying flip zones starts with a clean chart. Always zoom out to gauge the overall trend, uptrend (higher highs/lows), or downtrend (lower highs/lows).
Mark the four types of supply and demand zones (RBR, DBR, RBD, DBD) using recent pivots.
-
Step 1: Spot the Overall Structure. In an uptrend, watch for RBD or DBD supply zones overhead as potential opposition.
-
Step 2: Drop to Lower Timeframes. From daily to 1-hour, look for breaks of structure (e.g., price breaking a swing low in an uptrend).
-
Step 3: Hunt for Failed Reactions. Price must react to the zone but fail to continue the trend; that’s your flip signal.
Trading them? Patience is key. Wait for confirmation via structure shift, then enter on retest.
Combining Liquidity with Flip Zones to Avoid Smart Money Traps
Flip zones shine brighter when paired with liquidity concepts. Markets move on liquidity; smart money needs it to fill big orders.
Ask: Has the flip zone swept liquidity (stop-loss clusters below lows or above highs)?
-
If Yes: Enter confidently on the flip zone retest.
-
If No: Wait for a sweep. Enter at extreme zones (deep RBR/DBR demand or RBD/DBD supply) or next ones after confirmation.
-
Why It Works: Avoids traps where price ignores the flip and hunts liquidity first.
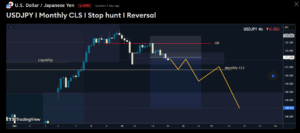
Example: In a downtrend, an RBD supply zone flips to demand at 1.1000 but hasn’t swept lows below. Price dives further, grabs stops, then reverses from an extreme DBR demand at 1.0950. “Smart money loves liquidity grabs,” notes an expert. “Combine this, and you dodge 90% of fakeouts.”
Motivational Nudge: This tweak alone can turn good trades into great ones—trade smarter, not harder.
A High Win Rate Trading Strategy Using Flip Zones
Put it all together for a powerhouse strategy:
-
Identify Trend and Zones: Mark RBR, DBR, RBD, and DBD zones on higher timeframes.
-
Confirm Shift: Wait for a failed reaction and structure break in a flip zone.
-
Check Liquidity: Ensure that you sweep or adjust the entry to the extreme or next zones.
-
Enter on Retest: 50% into the flip zone for confirmation, manual entry preferred.
-
Risk Management: Stop beyond zone, target 1:3+ R: R at next opposing zone.
This isn’t foolproof, no strategy is, but with discipline, expect 70%+ wins. Real Trader Story: “I used to blow accounts on resistance plays. Flip zones with liquidity? Now I’m consistent and stacking profits.”
Remember, the real edge? Patience. Wait for setups that scream “high probability.”
Conclusion
Mastering supply and demand in forex trading through the four core zones, RBR, DBR, RBD, and DBD, and their flips isn’t just a skill; it’s your ticket to trading like the pros, with precision, consistency, and serious rewards.
You’ve got the tools: Identify the zones, spot shifts, trade smart, and always liquidity factor to stay ahead of traps.
Ready to level up?
Dive deeper into advanced strategies or join our trading program for live mentorship and proven setups.
Sign up today and start turning knowledge into profits.
Your next big win awaits!